4. Developing Locally
This chapter walks through the process of bootstrapping a baremetal machine to serve as a Virtualbox hypervisor for hosting multiple Virtual Machine guests, serving as the Ansible control host for managing their configuration.
Note
Some of the examples here explicitly use -i to point to an inventory
directory, and some do not. When there is no -i flag, it is assumed
that /etc/ansible/ansible.cfg, or a perhaps ansible.cfg in the top
level of a private customization directory, is configured to point to the
correct inventory directory.
You can see what the default is using ansible --help:
Usage: ansible <host-pattern> [options]

Options:
  . . .
  -i INVENTORY, --inventory-file=INVENTORY
                        specify inventory host path
                        (default=/Users/dittrich/dims/git/ansible-dims-
                        playbooks/inventory) or comma separated host list.
  . . .

..
… or by using ansible --version:
ansible 2.3.0.0
  config file = /etc/ansible/ansible.cfg
  configured module search path = [u'/home/dittrich/dims/git/private-develop/library',
  u'/home/dittrich/dims/git/ansible-dims-playbooks/library', u'/usr/share/ansible']
  python version = 2.7.13 (default, Jun 23 2017, 23:57:31) [GCC 4.8.4]
If this is set up properly, you should be able to list the all group
and see results for the correct deployment:
$ ansible --list-hosts
hosts (11):
  blue14.devops.local
  purple.devops.local
  node03.devops.local
  vmhost.devops.local
  node02.devops.local
  yellow.devops.local
  node01.devops.local
  orange.devops.local
  red.devops.local
  blue16.devops.local
  hub.devops.local
4.1. Initial Connectivity
The first step in putting hosts under Ansible control is to add them to an
inventory, setting parameters allowing access to them. We will add them to a
local “private” configuration repository, rooted at $GIT/private-develop.
Since these are systems newly installed using an Ubuntu Kickstart USB drive,
they only have a password on the ansible account that we set up, and were installed
with IP addresses that were assigned by DHCP on the local subnet at installation
time. Until they have been fully configured, they have been assigned an address
on (the original DHCP assignments are commented out on lines 12 and 15, and the
actively working addresses set on lines 24 and 26.)
were manually set up on ports connected to an internal VLAN.
The relevant portions of the YAML inventory file are shown here, listed in the
servers inventory, with host variables defined in the children subgroup
named bootstrap that we can refer to in Ansible ad-hoc mode:
1 2 3 4 5 6 7 8 9 10 11 12 13 14 15 16 17 18 19 20 21 22 23 24 25 26 | ---
# File: inventory/servers/nodes.yml
servers:
vars:
ansible_port: 8422
hosts:
'other-hosts-not-shown':
'stirling.devops.develop':
#ansible_host: '140.142.29.161'
'dellr510.devops.develop':
#ansible_host: '140.142.29.186'
children:
bootstrap:
vars:
ansible_port: 22
http_proxy: ''
https_proxy: ''
hosts:
'stirling.devops.develop':
ansible_host: '10.142.29.161'
'dellr510.devops.develop':
ansible_host: '10.142.29.186'
# vim: ft=ansible :
|
Validate the temporary bootstrap group that defines the two hosts we are
setting up using the debug module to show the ansible_host variable and
ensure they match what we set them to.
$ ansible -i inventory/ -m debug -a 'var=vars.ansible_host' bootstrap
stirling.devops.develop | SUCCESS => {
    "changed": false,
    "vars.ansible_host": "10.142.29.161"
}
dellr510.devops.develop | SUCCESS => {
    "changed": false,
    "vars.ansible_host": "10.142.29.186"
}
Now use the password that was set up at install time to validate that
SSH is working using the ping or raw module (both are shown
here, though only one test is necessary to validate connectivity).
Note
For this example, SSH host key checking is being temporarily disabled as we are using an internal VLAN. The host keys were written down in a journal when the installation was performed and SSH used manually to validate the key, which will be collected in a later step.
$ export ANSIBLE_HOST_KEY_CHECKING=False
$ ansible --ask-pass -m ping  bootstrap
SSH password:
dellr510.devops.develop | SUCCESS => {
    "changed": false,
    "ping": "pong"
}
stirling.devops.develop | SUCCESS => {
    "changed": false,
    "ping": "pong"
}
$ ansible -m raw -a uptime --ask-pass bootstrap
SSH password:
dellr510.devops.develop | SUCCESS | rc=0 >>
 22:21:50 up  3:37,  3 users,  load average: 0.78, 1.45, 1.29
Shared connection to 140.142.29.186 closed.


stirling.devops.develop | SUCCESS | rc=0 >>
 22:21:51 up  4:15,  3 users,  load average: 2.45, 1.49, 1.18
Shared connection to 140.142.29.161 closed.
Use the ansible account password with ad-hoc mode to invoke the
authorized_key module to insert the ansible SSH private key in the
account on the remote systems, using the file lookup and the
dims.function shell utility function to derive the path to the
private key, adding the .pub extension to get the public key.
$ ansible -m authorized_key -a "user=ansible state=present \
> key='{{ lookup('file', '$(dims.function get_ssh_private_key_file ansible).pub') }}'" \
> --ask-pass bootstrap
SSH password:
dellr510.devops.develop | SUCCESS => {
    "changed": true,
    "exclusive": false,
    "key": "ssh-rsa AAAAB3NzaC1yc2...",
    "key_options": null,
    "keyfile": "/home/ansible/.ssh/authorized_keys",
    "manage_dir": true,
    "path": null,
    "state": "present",
    "unique": false,
    "user": "ansible",
    "validate_certs": true
}
stirling.devops.develop | SUCCESS => {
    "changed": true,
    "exclusive": false,
    "key": "ssh-rsa AAAAB3NzaC1yc2...",
    "key_options": null,
    "keyfile": "/home/ansible/.ssh/authorized_keys",
    "manage_dir": true,
    "path": null,
    "state": "present",
    "unique": false,
    "user": "ansible",
    "validate_certs": true
}
4.2. Establishing Full Internet Connectivity
Now that the SSH public key is in the authorized_keys files, we can remove
the --ask-pass option and present the SSH private key to validate that
standard remote access with Ansible will now work. Let’s also use this
opportunity to test outbound network access by sending an ICMP packet
to one of Google’s DNS servers.
$ ansible -i inventory/ --ask-pass -m shell -a "ping -c 1 8.8.8.8"  bootstrap
SSH password:
dellr510.devops.develop | SUCCESS | rc=0 >>
PING 8.8.8.8 (8.8.8.8) 56(84) bytes of data.
64 bytes from 8.8.8.8: icmp_seq=1 ttl=57 time=1.39 ms

--- 8.8.8.8 ping statistics ---
1 packets transmitted, 1 received, 0% packet loss, time 0ms
rtt min/avg/max/mdev = 1.395/1.395/1.395/0.000 ms

stirling.devops.develop | SUCCESS | rc=0 >>
PING 8.8.8.8 (8.8.8.8) 56(84) bytes of data.
64 bytes from 8.8.8.8: icmp_seq=1 ttl=57 time=1.44 ms

--- 8.8.8.8 ping statistics ---
1 packets transmitted, 1 received, 0% packet loss, time 0ms
rtt min/avg/max/mdev = 1.446/1.446/1.446/0.000 ms
4.3. Bootstrapping Full Ansible Control
At this point we have verified Ansible can access the systems and that
they can access the Internet. Those are the basics we need to now run
the bootstrap.yml playbook to prepare the system for being a
virtual machine hypervisor and Ansible control host. The tasks
performed (at the high level) are seen here:
---

# File: roles/bootstrap/tasks/main.yml

# This role is intended to be run once after initial
# operating system installation to ensure that the system
# is ready to be controlled remotely using Ansible. That
# includes things like timezone setting and NTP time
# synchronization, installation of required packages,
# configuration of OpenSSH, initial firewall settings, 'sudo'
# access for the 'ansible' account, etc.

# This role can be applied using the generic
# 'playbooks/base_playbook.yml' file, setting the 'host'
# and 'role' variables appropriately for the target host(s).
# Be sure to use '--become' as well, as all of these tasks
# require root.
#
#  $ ansible-playbook $PBR/playbooks/bootstrap.yml \
#  > --ask-become-pass --ask-pass --become -e host=bootstrap

- name: Ensure hardware-specific packages present
  import_tasks: 'hardware.yml'
  tags: [ 'bootstrap', 'hardware' ]

- name: Ensure required packages are present
  import_tasks: '{{ tasks_path }}/packages.yml'
  tags: [ 'bootstrap', 'packages' ]

- name: Ensure timezone set
  import_tasks: 'timezone.yml'
  tags: [ 'bootstrap', 'timezone' ]

- name: Ensure NTP sync set up
  import_tasks: 'ntpcheck.yml'
  tags: [ 'bootstrap', 'ntpcheck' ]

- name: Establish sudo access
  import_tasks: 'sudo.yml'
  tags: [ 'bootstrap', 'sudo' ]

- name: Ensure hostname is set consistent with base role
  import_tasks: '{{ tasks_path }}/hostname.yml'
  tags: [ 'bootstrap', 'hostname' ]

- name: Ensure DIMS-specific resources present
  import_tasks: dims_base.yml
  tags: [ 'bootstrap', 'dims_base' ]

- name: Set up SSH access for Ansible control
  import_tasks: 'ssh.yml'
  tags: [ 'bootstrap', 'ssh' ]

- name: Set up monitoring features
  import_tasks: 'monitoring.yml'
  tags: [ 'bootstrap', 'monitoring' ]

- name: Display diagnostic and validation information
  import_tasks: 'info.yml'
  tags: [ 'bootstrap', 'info' ]

# vim: ft=ansible :
Run the playbook as shown (or substitute the inventory host name
directly, e.g., dellr510.devops.develop, instead of the group
name bootstrap. Using the group, you can prepare as many hosts
as you wish at one time, in this case we show configuration of
two hosts simultaneously.
$ ansible-playbook -i inventory/ $PBR/playbooks/bootstrap.yml --ask-become-pass --ask-pass --become -e host=bootstrap
SSH password:
SUDO password[defaults to SSH password]:

PLAY [Bootstrapping 'bootstrap'] **********************************************

TASK [Debugging] **************************************************************
Sunday 23 July 2017  12:41:06 -0700 (0:00:00.060)       0:00:00.060 ***********
skipping: [dellr510.devops.develop]
skipping: [stirling.devops.develop]

TASK [Include codename-specific variables] ************************************
Sunday 23 July 2017  12:41:07 -0700 (0:00:01.063)       0:00:01.124 ***********
ok: [dellr510.devops.develop] => (item=/home/dittrich/dims/git/ansible-dims-playbooks/playbooks/../vars/trusty.yml)
ok: [stirling.devops.develop] => (item=/home/dittrich/dims/git/ansible-dims-playbooks/playbooks/../vars/trusty.yml)

TASK [bootstrap : Check for Broadcom device 14e4:43b1] ************************
Sunday 23 July 2017  12:41:08 -0700 (0:00:01.075)       0:00:02.200 ***********
changed: [stirling.devops.develop]
changed: [dellr510.devops.develop]

TASK [bootstrap : Ensure Broadcom wireless kernel in place] *******************
Sunday 23 July 2017  12:41:10 -0700 (0:00:01.705)       0:00:03.905 ***********
skipping: [dellr510.devops.develop]
skipping: [stirling.devops.develop]

TASK [bootstrap : Make sure required APT packages are present (Debian)] *******
Sunday 23 July 2017  12:41:11 -0700 (0:00:01.633)       0:00:05.539 ***********
ok: [dellr510.devops.develop] => (item=[u'apt-transport-https', u'bash-completion', u'ca-certificates', u'cpanminus', u'curl', u'dconf-tools', u'git-core', u'default-jdk', u'gitk', u'gnupg2',
 u'htop', u'hunspell', u'iptables-persistent', u'ifstat', u'make', u'myrepos', u'netcat', u'nfs-common', u'chrony', u'ntpdate', u'openssh-server', u'patch', u'perl', u'postfix', u'python', u'
python-apt', u'remake', u'rsync', u'rsyslog', u'sshfs', u'strace', u'tree', u'vim', u'xsltproc', u'chrony', u'nfs-kernel-server', u'smartmontools', u'unzip'])
ok: [stirling.devops.develop] => (item=[u'apt-transport-https', u'bash-completion', u'ca-certificates', u'cpanminus', u'curl', u'dconf-tools', u'git-core', u'default-jdk', u'gitk', u'gnupg2',
 u'htop', u'hunspell', u'iptables-persistent', u'ifstat', u'make', u'myrepos', u'netcat', u'nfs-common', u'chrony', u'ntpdate', u'openssh-server', u'patch', u'perl', u'postfix', u'python', u'
python-apt', u'remake', u'rsync', u'rsyslog', u'sshfs', u'strace', u'tree', u'vim', u'xsltproc', u'chrony', u'nfs-kernel-server', u'smartmontools', u'unzip'])

TASK [bootstrap : Make sure required APT packages are present (RedHat)] *******
Sunday 23 July 2017  12:41:26 -0700 (0:00:15.023)       0:00:20.562 ***********
skipping: [dellr510.devops.develop] => (item=[])
skipping: [stirling.devops.develop] => (item=[])

TASK [bootstrap : Ensure dims_timezone is set] ********************************
Sunday 23 July 2017  12:41:27 -0700 (0:00:01.168)       0:00:21.731 ***********
skipping: [dellr510.devops.develop]
skipping: [stirling.devops.develop]

TASK [bootstrap : Set timezone variables] *************************************
Sunday 23 July 2017  12:41:28 -0700 (0:00:01.069)       0:00:22.800 ***********
changed: [dellr510.devops.develop]
changed: [stirling.devops.develop]

TASK [bootstrap : Ensure Debian chrony package is installed] ******************
Sunday 23 July 2017  12:41:31 -0700 (0:00:02.035)       0:00:24.836 ***********
ok: [dellr510.devops.develop]
ok: [stirling.devops.develop]

TASK [bootstrap : Ensure chrony is running on Debian] *************************
Sunday 23 July 2017  12:41:33 -0700 (0:00:02.679)       0:00:27.515 ***********
ok: [dellr510.devops.develop]
ok: [stirling.devops.develop]

TASK [bootstrap : Ensure RedHat chrony package is installed] ******************
Sunday 23 July 2017  12:41:35 -0700 (0:00:01.601)       0:00:29.116 ***********
skipping: [dellr510.devops.develop]
skipping: [stirling.devops.develop]

TASK [bootstrap : Ensure chrony is running on RedHat] *************************
Sunday 23 July 2017  12:41:36 -0700 (0:00:01.067)       0:00:30.184 ***********
skipping: [dellr510.devops.develop]
skipping: [stirling.devops.develop]

TASK [bootstrap : Verify that the sudo group exists] **************************
Sunday 23 July 2017  12:41:37 -0700 (0:00:01.066)       0:00:31.250 ***********
ok: [dellr510.devops.develop]
ok: [stirling.devops.develop]

TASK [bootstrap : Set fact with temp sudoers filename] ************************
Sunday 23 July 2017  12:41:38 -0700 (0:00:01.462)       0:00:32.712 ***********
ok: [dellr510.devops.develop]
ok: [stirling.devops.develop]

TASK [bootstrap : Copy sudoers template to temporary file] ********************
Sunday 23 July 2017  12:41:39 -0700 (0:00:01.068)       0:00:33.781 ***********
changed: [dellr510.devops.develop]
changed: [stirling.devops.develop]

TASK [bootstrap : Back up sudoers file] ***************************************
Sunday 23 July 2017  12:41:41 -0700 (0:00:01.914)       0:00:35.695 ***********
changed: [dellr510.devops.develop]
changed: [stirling.devops.develop]

TASK [bootstrap : Verify sudoers before replacing] ****************************
Sunday 23 July 2017  12:41:43 -0700 (0:00:01.398)       0:00:37.093 ***********
changed: [dellr510.devops.develop]
changed: [stirling.devops.develop]

TASK [bootstrap : Define variable with ansible public key] ********************
Sunday 23 July 2017  12:41:44 -0700 (0:00:01.508)       0:00:38.602 ***********
ok: [dellr510.devops.develop]
ok: [stirling.devops.develop]

TASK [bootstrap : Ensure ansible public key in authorized_keys] ***************
Sunday 23 July 2017  12:41:46 -0700 (0:00:02.083)       0:00:40.686 ***********
ok: [dellr510.devops.develop]
changed: [stirling.devops.develop]

TASK [bootstrap : Show interface details (Debian)] ****************************
Sunday 23 July 2017  12:41:48 -0700 (0:00:01.710)       0:00:42.397 ***********
changed: [dellr510.devops.develop]
changed: [stirling.devops.develop]

TASK [bootstrap : debug] ******************************************************
Sunday 23 July 2017  12:41:49 -0700 (0:00:01.397)       0:00:43.794 ***********
ok: [dellr510.devops.develop] => {
    "_ifconfig.stdout_lines": [
        "em1       Link encap:Ethernet  HWaddr 78:2b:cb:57:9b:e1  ",
        "          UP BROADCAST RUNNING MULTICAST  MTU:1500  Metric:1",
        "",
        "em2       Link encap:Ethernet  HWaddr 78:2b:cb:57:9b:e2  ",
        "          inet addr:10.142.29.186  Bcast:10.142.29.255  Mask:255.255.255.0",
        "          UP BROADCAST RUNNING MULTICAST  MTU:1500  Metric:1",
        "",
        "lo        Link encap:Local Loopback  ",
        "          inet addr:127.0.0.1  Mask:255.0.0.0",
        "          UP LOOPBACK RUNNING  MTU:65536  Metric:1",
        "",
        "p2p1      Link encap:Ethernet  HWaddr 00:1b:21:c0:ff:30  ",
        "          UP BROADCAST MULTICAST  MTU:1500  Metric:1",
        "          Memory:de7c0000-de7dffff ",
        "",
        "p2p2      Link encap:Ethernet  HWaddr 00:1b:21:c0:ff:31  ",
        "          UP BROADCAST MULTICAST  MTU:1500  Metric:1",
        "          Memory:de7e0000-de7fffff ",
        "",
        "p3p1      Link encap:Ethernet  HWaddr 00:1b:21:c1:1c:34  ",
        "          UP BROADCAST MULTICAST  MTU:1500  Metric:1",
        "          Memory:dd7c0000-dd7dffff ",
        "",
        "p3p2      Link encap:Ethernet  HWaddr 00:1b:21:c1:1c:35  ",
        "          UP BROADCAST MULTICAST  MTU:1500  Metric:1",
        "          Memory:dd7e0000-dd7fffff "
    ],
    "changed": false
}
ok: [stirling.devops.develop] => {
    "_ifconfig.stdout_lines": [
        "em1       Link encap:Ethernet  HWaddr f0:4d:a2:40:92:1d  ",
        "          UP BROADCAST RUNNING MULTICAST  MTU:1500  Metric:1",
        "",
        "em2       Link encap:Ethernet  HWaddr f0:4d:a2:40:92:1f  ",
        "          inet addr:10.142.29.161  Bcast:10.142.29.255  Mask:255.255.255.0",
        "          UP BROADCAST RUNNING MULTICAST  MTU:1500  Metric:1",
        "",
        "em3       Link encap:Ethernet  HWaddr f0:4d:a2:40:92:21  ",
        "          UP BROADCAST MULTICAST  MTU:1500  Metric:1",
        "",
        "em4       Link encap:Ethernet  HWaddr f0:4d:a2:40:92:23  ",
        "          UP BROADCAST MULTICAST  MTU:1500  Metric:1",
        "",
        "lo        Link encap:Local Loopback  ",
        "          inet addr:127.0.0.1  Mask:255.0.0.0",
        "          UP LOOPBACK RUNNING  MTU:65536  Metric:1"
    ],
    "changed": false
}

TASK [bootstrap : Show interface details (MacOSX)] ****************************
Sunday 23 July 2017  12:41:51 -0700 (0:00:01.071)       0:00:44.866 ***********
skipping: [dellr510.devops.develop]
skipping: [stirling.devops.develop]

TASK [bootstrap : debug] ******************************************************
Sunday 23 July 2017  12:41:52 -0700 (0:00:01.069)       0:00:45.936 ***********
skipping: [dellr510.devops.develop]
skipping: [stirling.devops.develop]

TASK [bootstrap : Determine SSH host MD5 key fingerprints] ********************
Sunday 23 July 2017  12:41:53 -0700 (0:00:01.068)       0:00:47.004 ***********
changed: [dellr510.devops.develop]
changed: [stirling.devops.develop]

TASK [bootstrap : debug] ******************************************************
Sunday 23 July 2017  12:41:54 -0700 (0:00:01.472)       0:00:48.477 ***********
ok: [dellr510.devops.develop] => {
    "_md5.stdout_lines": [
        "1024 c9:58:58:f3:90:a6:1f:1c:ab:fb:8e:18:42:77:a2:88  root@D-140-142-29-186 (DSA)",
        "256 a2:61:50:25:6b:c3:02:43:55:a7:35:32:cb:96:f5:82  root@D-140-142-29-186 (ECDSA)",
        "256 e6:c8:11:ac:48:28:1f:bc:fd:ad:06:f4:0f:26:9e:5b  root@D-140-142-29-186 (ED25519)",
        "2048 55:ae:94:22:e1:ce:d4:2a:b6:d3:8b:aa:09:70:d1:38  root@D-140-142-29-186 (RSA)"
    ],
    "changed": false
}
ok: [stirling.devops.develop] => {
    "_md5.stdout_lines": [
        "1024 b1:41:a2:bd:c2:e8:3b:bd:14:3b:3f:7d:eb:e5:ba:10  root@D-140-142-29-161 (DSA)",
        "256 41:68:1e:59:4e:bd:0c:5b:25:c8:24:60:a8:d6:f1:c6  root@D-140-142-29-161 (ECDSA)",
        "256 bb:4b:89:f5:6b:45:7c:d3:9e:56:54:ea:8c:1b:79:8f  root@D-140-142-29-161 (ED25519)",
        "2048 96:95:e2:45:01:d2:45:2e:49:a8:7c:f6:39:28:0a:a5  root@D-140-142-29-161 (RSA)"
    ],
    "changed": false
}

TASK [bootstrap : Determine SSH host SHA256 key fingerprints] *****************
Sunday 23 July 2017  12:41:55 -0700 (0:00:01.076)       0:00:49.553 ***********
changed: [dellr510.devops.develop]
changed: [stirling.devops.develop]

TASK [bootstrap : debug] ******************************************************
Sunday 23 July 2017  12:41:57 -0700 (0:00:01.471)       0:00:51.025 ***********
ok: [dellr510.devops.develop] => {
    "_sha256.stdout_lines": [
        "ssh-dss dl/W3IeTv3aPGZdfX8q3L0yZE8gAbW6IbHw9uZlyYDU. root@D-140-142-29-186",
        "ecdsa-sha2-nistp256 8qqzBI22OGTY29T3WCKnpIPbyl1K0My9xwPiGEt9PmE. root@D-140-142-29-186",
        "ssh-ed25519 K4Bc5IttYf5WHE2nzuxTr9w8QzTMzIKZYUewvwCcuPc. root@D-140-142-29-186",
        "ssh-rsa rVUD1b6raug2Pp01pJLyWEHzxUfGbzOkwUxvhRzvH30. root@D-140-142-29-186"
    ],
    "changed": false
}
ok: [stirling.devops.develop] => {
    "_sha256.stdout_lines": [
        "ssh-dss EdHHaFS7LRtVqCKzlzYG68OpQNnKqEygWoEoM9lYtWs. root@D-140-142-29-161",
        "ecdsa-sha2-nistp256 3MicWfvhufEiPRiANS43Z/7MbcHHTythyOAhYluyD+w. root@D-140-142-29-161",
        "ssh-ed25519 gT0duOWxArehJR08iR0iFO4gDUqDCjT6P+lJYPT0MwI. root@D-140-142-29-161",
        "ssh-rsa MQl68HQR5Oip9MPlozLddlXA9Emcz9QTJLk0IJgVJOs. root@D-140-142-29-161"
    ],
    "changed": false
}

TASK [bootstrap : Determine SSH host SHA256 key fingerprints] *****************
Sunday 23 July 2017  12:41:58 -0700 (0:00:01.072)       0:00:52.097 ***********
skipping: [dellr510.devops.develop]
skipping: [stirling.devops.develop]

TASK [bootstrap : debug] ******************************************************
Sunday 23 July 2017  12:41:59 -0700 (0:00:01.069)       0:00:53.167 ***********
skipping: [dellr510.devops.develop]
skipping: [stirling.devops.develop]

RUNNING HANDLER [bootstrap : Update timezone] *********************************
Sunday 23 July 2017  12:42:00 -0700 (0:00:01.062)       0:00:54.229 ***********
changed: [dellr510.devops.develop]
changed: [stirling.devops.develop]

PLAY RECAP ********************************************************************
dellr510.devops.develop    : ok=20   changed=9    unreachable=0    failed=0
stirling.devops.develop    : ok=20   changed=10   unreachable=0    failed=0

Sunday 23 July 2017  12:42:02 -0700 (0:00:02.078)       0:00:56.307 ***********
===============================================================================
bootstrap : Make sure required APT packages are present (Debian) ------- 15.02s
bootstrap : Ensure Debian chrony package is installed ------------------- 2.68s
bootstrap : Define variable with ansible public key --------------------- 2.08s
bootstrap : Update timezone --------------------------------------------- 2.08s
bootstrap : Set timezone variables -------------------------------------- 2.04s
bootstrap : Copy sudoers template to temporary file --------------------- 1.91s
bootstrap : Ensure ansible public key in authorized_keys ---------------- 1.71s
bootstrap : Check for Broadcom device 14e4:43b1 ------------------------- 1.71s
bootstrap : Ensure Broadcom wireless kernel in place -------------------- 1.63s
bootstrap : Ensure chrony is running on Debian -------------------------- 1.60s
bootstrap : Verify sudoers before replacing ----------------------------- 1.51s
bootstrap : Determine SSH host MD5 key fingerprints --------------------- 1.47s
bootstrap : Determine SSH host SHA256 key fingerprints ------------------ 1.47s
bootstrap : Verify that the sudo group exists --------------------------- 1.46s
bootstrap : Back up sudoers file ---------------------------------------- 1.40s
bootstrap : Show interface details (Debian) ----------------------------- 1.40s
bootstrap : Make sure required APT packages are present (RedHat) -------- 1.17s
bootstrap : debug ------------------------------------------------------- 1.08s
Include codename-specific variables ------------------------------------- 1.08s
bootstrap : debug ------------------------------------------------------- 1.07s
4.4. Integration into Working Inventory
After the bootstrap role has been applied, the host should now be ready for
Ansible control. Create the host’s playbook and ensure that any required
variables are added to a more permanant inventory file. If this is anything
beyond a basic development (i.e., local) deployment, create a new
private customization repository (this will be discussed in more detail in
Section Customizing a Private Deployment).
Attention
Do not forget to add the host being bootstrapped to the all group in the
inventory. While it may be accessible by simply being listed in the children
subgroup with an ansible_host value like shown earlier, its
host_vars file will not be loaded unless it is included in the
all group.
This problem would go away if all of the variables formerly placed in
host_vars files were moved directly into the inventory files instead.
Set up the following to ensure that the host will be functional and under Ansible control for:
iptablesrules specified intcp_ports,udp_ports, and/orcustom_rulesthat will be templated into the rules files. These should lock the host down, while allowing access to hosts on internal VLANs for remote Ansible control, accessing internal repositories or source archives, etc./etc/network/interfacestemplate or variables necessary to define all desired network interfaces. This file should start out reflecting the network settings used to install the system and provide access to the internal VLAN.- Any
custom_hoststhat need to be defined in/etc/hoststo ensure connectivity out to remote systems (e.g., to an internal Git source repository host that is required to get private repositories, serve internal packages, etc.)
To separate these bootstrapping settings from normal settings, use
a children sub-group named bootstrap for the host being
set up. In this case, we are focusing on a host named
stirling.devops.develop.
---

# File: inventory/servers/nodes.yml

servers:
  vars:
    ansible_port: 8422
  hosts:
    'other-hosts-not-shown...':
    'stirling.devops.develop':
      #ansible_host: '10.142.29.182'
      #ansible_host: '140.142.29.161'
      ansible_user: 'ansible'
      zone_iface:
        'public': 'em2'
        'prisem': 'em1'
        'develop': 'em2'
        'swarm': 'vboxnet1'
        'consul': 'vboxnet1'
        'yellow_bridge': 'em1'
        'purple_bridge': 'em1'
      zones:
        - develop
      net:
        iface:
          'em1':
            #ip: '140.142.29.161'
            #ip: '140.142.13.171'
            #cidr_bits: 27
            ip: '0.0.0.0'
          'em2':
            ip: '10.142.29.161'
            netmask: '255.255.255.0'
            cidr_bits: 24
          'em3':
            ip: '10.3.0.1'
            netmask: '255.255.255.0'
            cidr_bits: 24
          'em4':
            ip: '10.4.0.1'
            netmask: '255.255.255.0'
            cidr_bits: 24
      tcp_ports: [ 9999 ]
      udp_ports: [ ]
      custom_hosts:
        - '10.142.29.98  source.devops.develop'
        - '10.142.29.115  eclipse.devops.develop'
  children:
    bootstrap:
      vars:
        ansible_port: 22
        http_proxy: ''
        https_proxy: ''
      hosts:
        'stirling.devops.develop':
            ansible_host: '10.142.29.161'
            private_develop: "{{ lookup('env','GIT') }}/private-develop"
            private_repository: "git@git.devops.develop:/var/opt/private-develop.git"
            private_repository_hostkey: "2048 78:82:74:66:56:93:a7:9d:54:ce:05:ed:8a:0d:fa:b4  root@git.devops.develop (RSA)"
            private_repository_hostname: "git.devops.develop"
            ansible_ssh_private_key_file: "{{ lookup('dims_function', 'get_ssh_private_key_file {{ ansible_user }} {{ private_develop }}') }}"
            install_ssh_keypair: true
            bootstrap_private: true
            artifacts_url: 'http://source.devops.develop/source/'
            ssh_config_hosts:
              - hostname_short: 'git'
                hostname: git.devops.develop
                user: git
                port: 8422

# vim: ft=ansible :
As for the host playbook, here is an example of a complete playbook for a virtual machine manager host with development capabilities.
1 2 3 4 5 6 7 8 9 10 11 12 13 14 15 16 17 18 19 20 21 22 23 24 25 26 27 28 29 30 31 32 33 34 35 36 37 38 39 40 | ---
# File: v2/playbooks/hosts/stirling.devops.develop.yml
- name: Configure host "stirling.devops.develop"
hosts: stirling.devops.develop
vars:
playbooks_root: "{{ lookup('env', 'PBR') }}"
dims_private: "{{ lookup('env', 'GIT') }}/private-{{ deployment }}"
https_proxy: 'https://127.0.0.1:8000'
vars_files:
- "{{ playbooks_root }}/vars/global.yml"
- "{{ playbooks_root }}/vars/trusty.yml"
remote_user: "ansible"
become: yes
roles:
- { role: base, packages_upgrade: true }
- { role: hosts }
- { role: dns }
- { role: dims-ci-utils }
- { role: python-virtualenv, use_sphinx: true }
- { role: ansible-server }
- { role: docker }
- { role: consul }
- { role: packer }
- { role: vagrant }
- { role: virtualbox }
- { role: vncserver }
- { role: nginx }
- { role: byobu }
- { role: apache-directory-studio }
handlers:
- include_tasks: "{{ handlers_path }}/restart_services.yml"
# vim: ft=ansible :
|
Some roles of note (highlighted above) are the following:
ansible-serverwill set the host up for serving as an Ansible control host. This includes installing shared public roles that are being used for installing certain services, cloning theansible-dims-playbooksrepository (masterbranch by default), and installing theansibleuser SSH key pair.dnswill set up “split-horizon” DNS service, serving an internal domain used by virtual machines and the hypervisor host for looking up IP addresses on internal interfaces connected to private VLANs and/or virtual networks. The zone(s) that will be served by this host are defined by thezonesarray, which uses mappings to dictionaries holding interface information in order to derive the name-to-IP mappings for each zone.- The roles
vagrant,packer, andvirtualboxset the host up for serving as a Virtualbox hypervisor that can use DIMS helper scripts for automated creation of Vagrant boxes. (This capability is useful for development and testing, but is not recommended for “production” use.) vncserverwill configure the host for remotely running graphical user interface programs (e.g., thevirtualboxmanagement interface) using VNC tunneled over SSH. (It also creates a helper script on the control host running this playbook to facilitate setting up the SSH tunnel that we will use to manually create virtual machines in the following section).nginxsets up a reverse proxy web server that can be used to serve box files, operating system installation ISO image files, and packaged artifacts cached from public sources or non-public sources (e.g., from an internal Jenkins build server).
Note
As a ballpark estimate of time-to-deploy for an initial virtual machine host
server, using a Dell R710 with a 1 Gbps ethernet connection, the initial
Ubuntu Kickstart operating system installation took approximately 30 minutes.
The bootstrap playbook to get the system to password-less Ansible control
took about another 5 minutes. The first complete run of the host playbook
(which, including the lengthy python-virtualenv build task) adds over a
thousand new packages, took about 45 minutes to complete. This is a total
time of just under 1.5 hours (and these steps could be done in
parallel with multiple hosts with just a small additional overhead for
setting variables for each host.)
4.5. Normal Playbook Operations
Now run the host’s playbook to fully configure it and update packages. This can
be done from the Ansible control host being used to remotely bootstrap the
new server, or from within the server itself. If the desire is to hand the
newly bootstrapped system off to a production operations group, the normal
means of administering the system may be for them to log in to it using
SSH and run the host’s playbook locally. To make this easier (or for developers
to keep their own systems up to date), a helper command run.playbook is
set up. Running just this command will execute the full playbook.
To only execute part of the playbook, use the --tags option to
select the set of tags you wish to apply as described in Section
Tags on Tasks. For example, to just apply any updated packages,
use run.playbook --tags updates, or to just apply changes to
iptables rules files and reload them, use run.playbook --tags iptables.
To run the playbook using Ansible directly, performing both of the example tasks just listed at once, the command would look like this:
$ ansible-playbook $DIMS_PRIVATE/playbooks/hosts/dellr510.devops.develop --tags updates,iptables
4.6. Validating VNC over SSH Tunnelling
The last thing we will do to validate our VM hypervisor and Ansible control host is ready to use for managing virtual machines is to establish an SSH tunnelled VNC connection using Remmina. Run the helper script to establish the tunnel:
$ vnc.dellr510.devops.develop
[+] X11 forwarding connection to dellr510.devops.develop established.
[+] Remote X11 DISPLAY is :1
[+] Configure your VNC client to use 127.0.0.1:5901
[+] Use CTRL-C or ENTER to break tunnel connection...
Now run the following command in a shell window, or use the task bar to run the Remmina application:
$ remmina &
Note
The & at the end of the command line puts the application into the background. Remmina,
like other X11 or Gnome applications, does not use the command line for keyboard input. Instead,
it uses the X11 graphical user interface features. Leaving the & off will make the terminal
window appear to “hang” as the prompt will not be returned until the Remmina graphical application
quits. For more details, see How to clean launch a GUI app via the Terminal (so it doesn’t wait
for termination)?
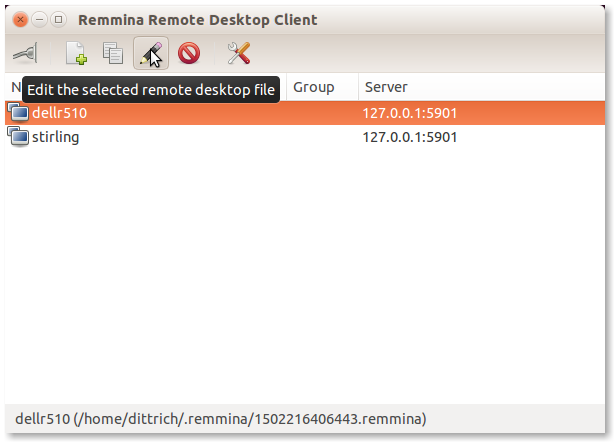
Remmina Main Screen
Select Create a new remote desktop file (the sheet of paper with a green
+ sign) if this is the first time you are running Remmina. In this case, a
connection was already created so we will instead select Edit (the pencil
icon) to edit the settings. Save them when you are done to get back to the
main menu.
Note
The password to use here is one set by the variable vnc_server_default
in the roles/vncserver/defaults/main.yml file. As long as the VNC
server is bound to localhost, the risk is limited to the local system.
For improved security, set this password to something strong by over-riding
the default password with this variable in a private customization
repository and/or Ansible Vault file using the techniques described in
Section Customizing a Private Deployment.
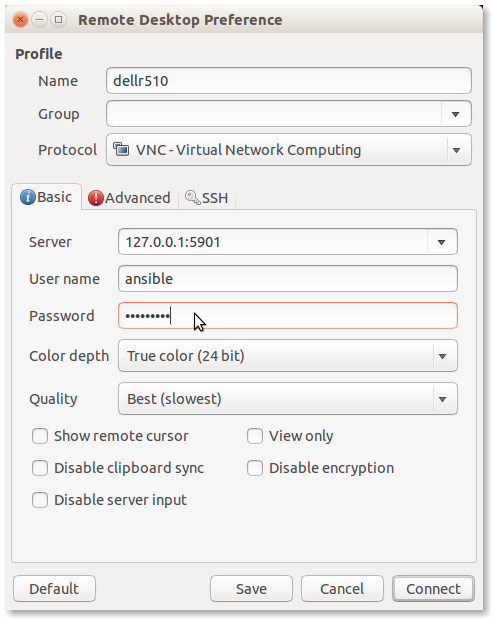
Remmina Edit Screen
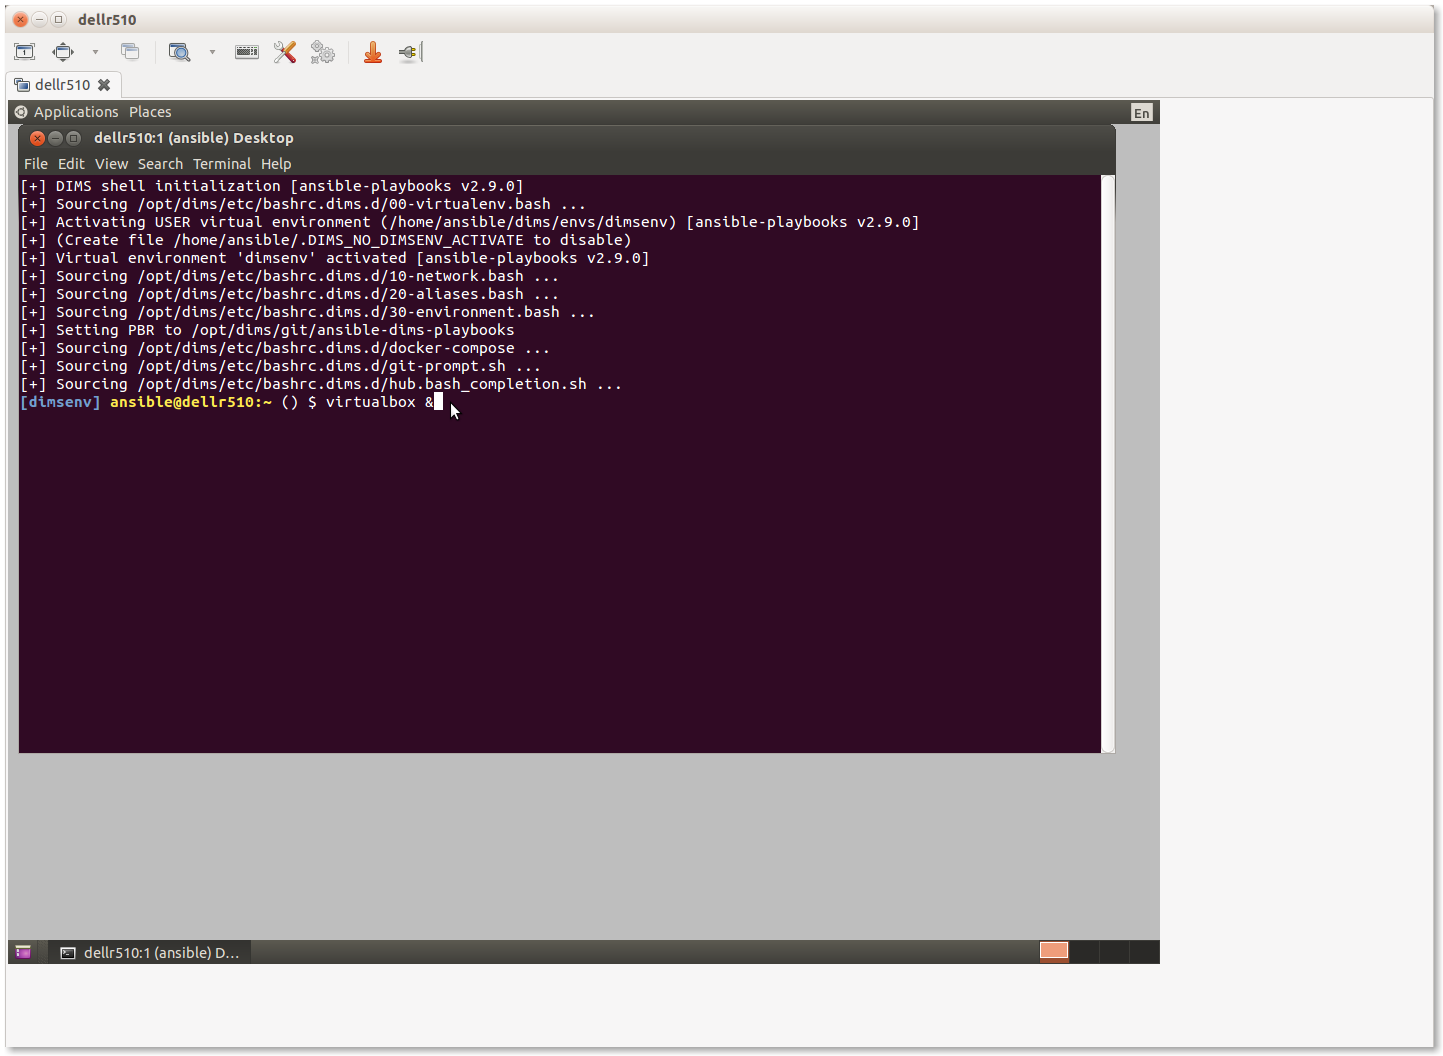
When you then select the item (dellr510 in this case) and press Open the
connection to the selecetd remote desktop file (the icon that looks like a
light switch on the far left of the icon bar), you should now have a graphical
desktop with a terminal window open on the remote host as seen here:

Initial Remmina VNC Connection
4.7. Creating VMs
The Ansible control host that was just set up can now be used to control a set of virtual machines, bare metal hosts, or a combination. It all depends on what services you wish to provide and how you chose to deploy them.
There are several options for creating a hybrid “private-cloud” comprised from a combination of bare-metal hosts, virtual machine hosts, and containerized microservices. This flexibility comes at a cost in added complexity and configuration management, but does afford for better linear horizontal scalability and/or addition of compute or storage resources as the system grows in size.
Hint
For the bigger picture of architectural design options considered while designing and building the DIMS system components, see Section DIMS architectural design of dimsad.
Figure Pure Virtual Machine Architecture shows a design similar to that being described in this and the previous chapters. The Host is shown at the bottom, comprised of a highly-provisioned server, a base operating system and a virtual machine hypervisor. Each virtual machine Guest is then created and installed with its own combination of base operating system, libraries and binaries, and application software. In this illustration, we see a single physical computer with a total of six servers (4 Ubuntu Linux, 1 Red Hat Enterprise Linux, and 1 Debian Linux).

Pure Virtual Machine Architecture
The deployment we are currently creating is even simpler than Figure
Pure Virtual Machine Architecture. There is the one bare-metal server acting as the
Ansible control host and Virtualbox hypervisor (dellr510) and just two
virtual machine guests (yellow and purple, a.k.a. the trident
group). These guests will use bridged interfaces so they each have an
Internet-facing IP address and domain name, as well as a private virtual LAN
that is shared with the host for Ansible control and administration. For
increased security, the bare-metal VM host will only be accessible through an
internal VLAN.
4.7.1. Manual Installation of Virtual Machines
This section walks through the process of manually creating two
Debian 8.5 virtual machines to serve as Trident trust group
portal servers. This deployment combines all of the Trident
related services into one virtual machine. One of the two
vitual machines (yellow) will serve as the “production”
portal, and the other identical system (purple) will
serve as a development/test server. The latter can be used to
experiment with upgrades, test Ansible playbook changes,
train system administrators and trust group administrators.
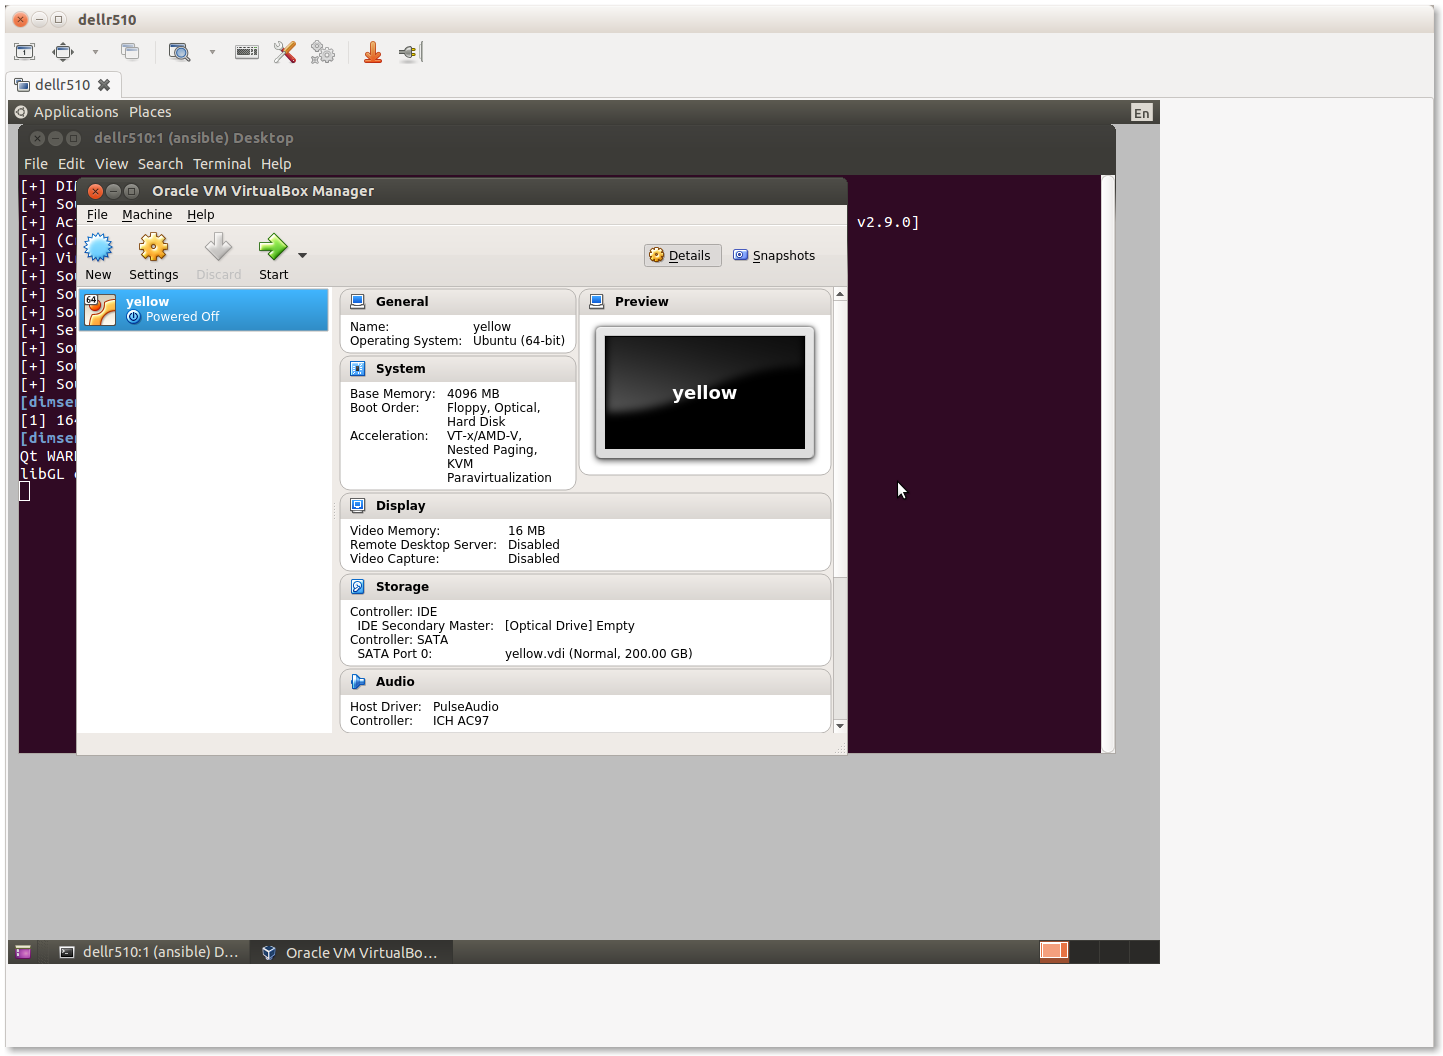
Start the Virtualbox management GUI in the Remmina VNC window.
Running Virtualbox management GUI over VNC
This should bring up the Virtualbox management GUI.

Virtualbox management GUI
Select New to create a new virtual machine. Most tabs have a Next> button to go to the following tab, or select Settings after highlighting the VM you want to configure, or and press the Right mouse button and chose Settings… or use the keyboard shortcut CTRL-S.
Initial yellow VM
Individual groupings of settings (e.g., System for boot order, processor settings, etc., Storage for virtual hard drives, Network for NICs) are on the left of the Settings panel.
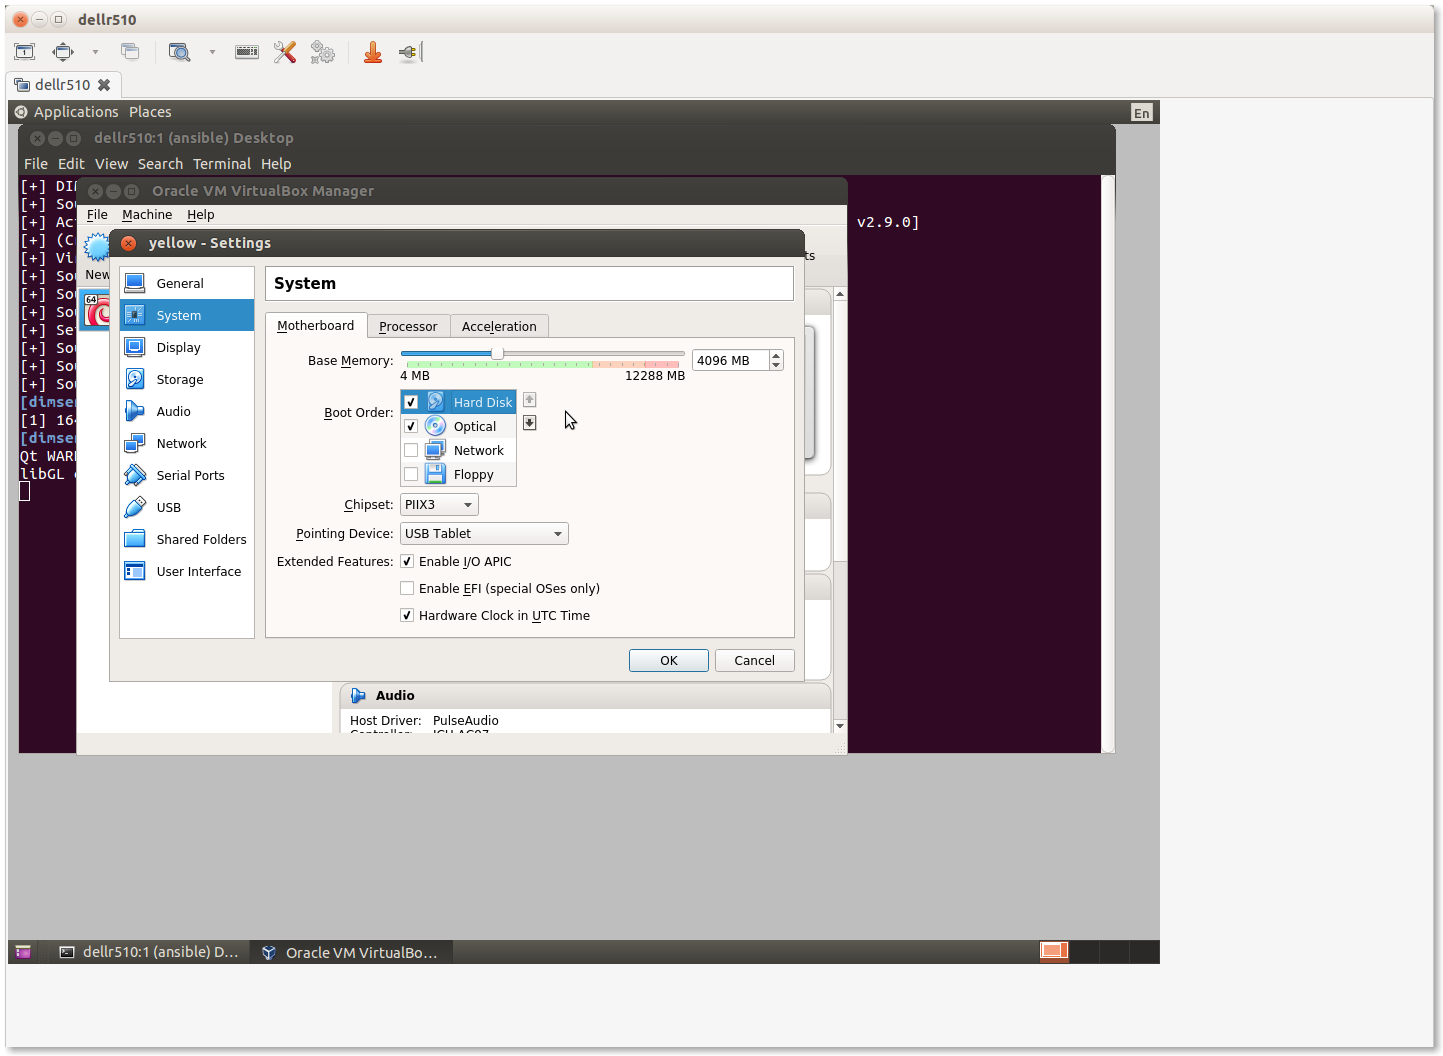
VM System Settings
Navigate through the menus to set the following attributes:
Set Name:
yellowSet Type: Linux
Set Version: Ubuntu (64-bit)
Set memory (e.g., 4096 MB)
Create a virtual disk, type VDI (VirtualBox Disk Image), dynamically allocated, making it generously large in relation to available disk space to provide adequate storage space for Trident upload files (e.g., 200GB).
Configure three NICs:
- Adapter 1 should be attached to NAT to provide host-only access with NAT to get to the Internet while setting up the VM.
- Adapter 2 should be attached to Bridged Adapter, name
em2in this case. (This is the host NIC attached to the internal VLAN in this configuration). This interface in the guest (eth1) will be used for local Ansible control and communication with internal hosts.- Adapter 3 should be attached to Bridged Adapter, name
em1in this case. (This is the host NIC attached to the Internet in this configuration, which will be set to0.0.0.0to prevent direct communication from the Internet to the VM host using this interface). This interface in the guest (eth2) will have the public IP address for the Trident portal, email delivery, etc.Set the system boot order to be Hard Disk first, followed by Optical drive. The first boot with an empty hard drive will boot from the Optical drive, while subsequent reboots will use the operating system installed on the Hard Disk.
Increase the number of CPUs (for a 16 core VM host, 3 or 4 cores is reasonable.)
Note
All of these settings can be tuned later on if it is determined that they
are too low (or too high). Use a program like htop on the virtual machine
host to watch things like CPU saturation, memory saturation, swap usage,
etc.
After configuring the first VM yellow, produce a full clone of the VM and
name it purple. This will be the backup Trident server. Check the box to
regenerate MAC addresses for the network interfaces to ensure that they are
separable at the packet level in case network diagnostics need to be performed
using tcpdump or other network tools.
Once both of the VMs are set up, start them to boot from the Debian installation ISO attached to the virtual DVD drive.
Note
We are not using Kickstart here, as we did for the baremetal host in Section Bootstrapping DigitalOcean Droplets, which means that a number of steps that were automatically performed during system installation will need to be performed manually. This is an area of automation that needs further work to unify and standardize the boot process using Kickstart from Jinja templates and inventory variables, allowing a consistent, configurable, repeatable, and much faster system setup. This will result in time and cost savings that scale better and help new teams more quickly deploy a full system.
- Use LVM on the entire drive, with separate partitions for
/tmp,/home, and/var. - Choose Debian desktop environment, with Gnome, de-select print server and select SSH server, leaving standard system utilities selected, and press Tab and Enter to Continue.
- Create the
ansibleaccount using the password you created for this deployment. Also set therootpassword (ideally to a different password than theansibleaccount, to be used for emergency console access when and if something disables access to theansibleaccount.)
At the end of the operating system installation process, it will ask you to reboot. The guest should then show the Grub boot menu and proceed to boot into Debian, presenting the login screen when the system is up and running.

Login screen for yellow VM
4.7.2. Bootstrapping the New VMs
Before you can perform the bootstrapping process using Ansible, you must configure at least one network interface on each VM guest (as well as setting an IP address in the same network block on the bridged interface of the host) to allow host-to-guest SSH access.
Manually edit the /etc/network/interfaces file to configure the initial
eth1 NIC to have the IP addresses assigned for the hosts in the inventory
file. Bring the interface up using ifup eth1 and test after setting up all
of the interfaces using the same steps as shown in Section
Establishing Full Internet Connectivity.
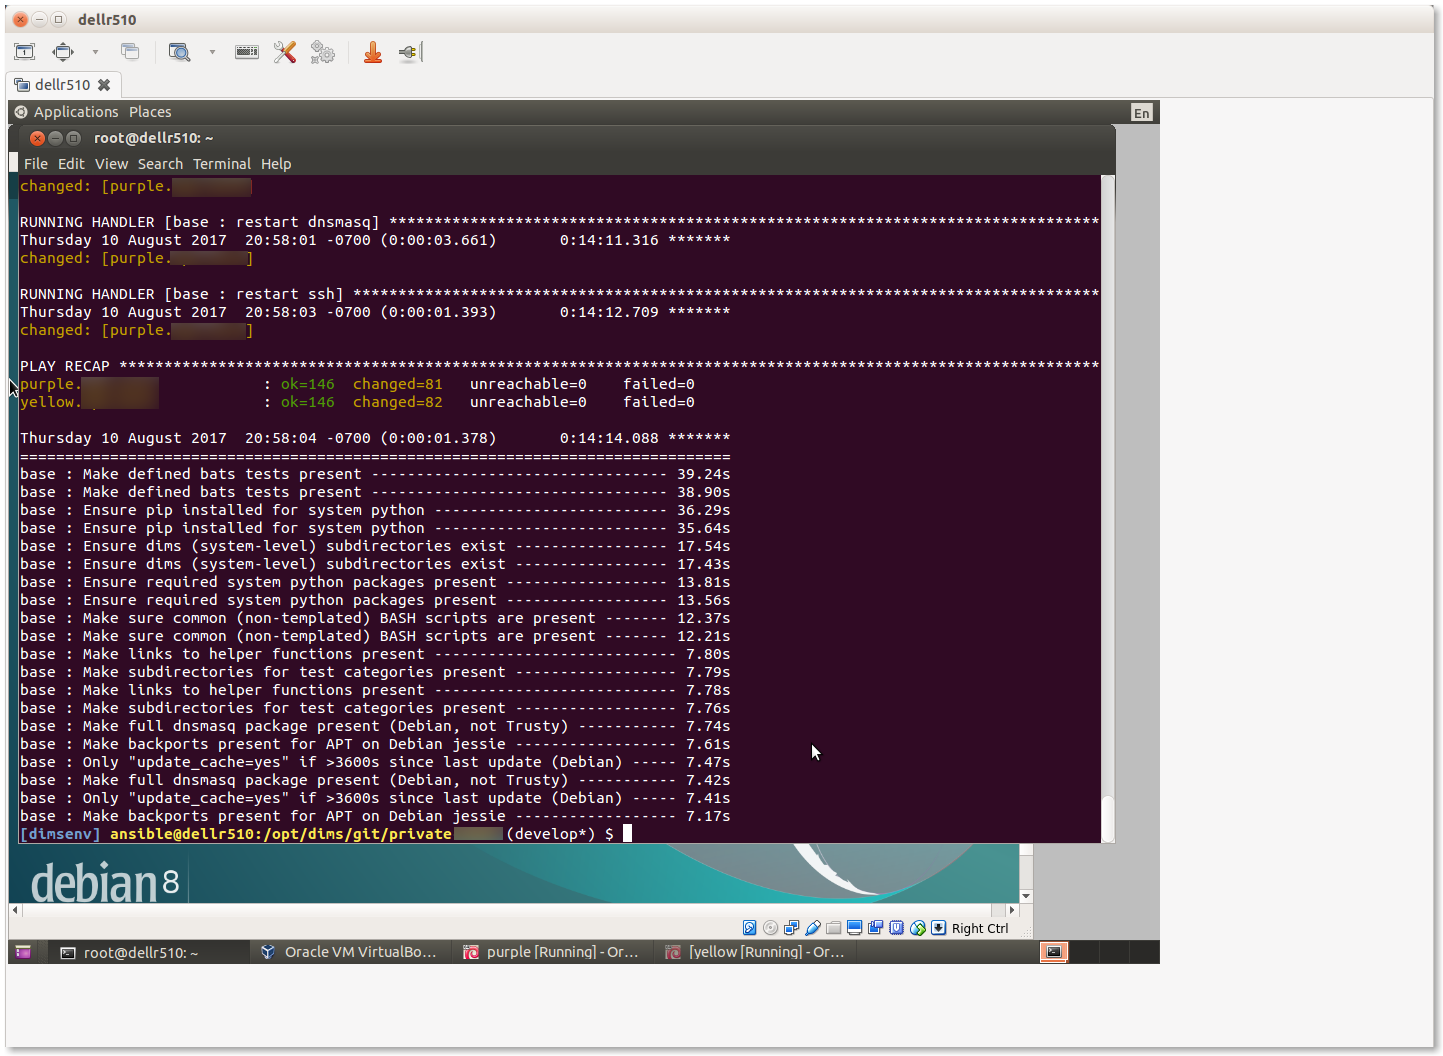
Once connectivity has been verified, apply the bootstrap.yml playbook
as shown in Section Bootstrapping Full Ansible Control, using the
trident group this time to bootstrap both VMs at the same time.

Bootstrapping the trident group
4.7.3. Initial Provisioning of the New VMs
Lastly, we will run the initial provisioning steps to install and configure
the two new VMs. For the purposes of this example, we will start by only
applying the base role tasks to make sure the fundamentals of our
customized configuration will work. The command we use is:
$ ansible-playbook $GIT/private-develop/master.yml --tags base --limit trident
Applying base role to trident group
Having applied the base role, network interfaces are set up,
iptables rules are in place, /etc/hosts file and DNS
resolution are configured, and packages have been updated. This would
be a good time to reboot both systems to ensure everything is applied
and functions. You can use Ansible ad-hoc mode to do this with
the command:
$ ansible -m shell --become -a 'shutdown -r now' trident`
After a minute or two, you can test connectivity again with the command:
$ ansible -m shell -a 'uptime' trident`
purple.devops.develop | SUCCESS | rc=0 >>
 14:22:33 up 0 min,  1 user,  load average: 0.86, 0.22, 0.07

yellow.devops.develop | SUCCESS | rc=0 >>
 14:22:33 up 0 min,  1 user,  load average: 0.79, 0.25, 0.09
At this point, the hosts are ready for application of their full playbooks.
Use --limit trident when running the master.yml playbook to only
operate on the two VMs in question.
Note
If Ansible Vault is being used to encrypt any secrets on disk, you will
need to either provide the password using the --ask-vault-pass
command line option or provide a path to the Vault password file
using the --vault-password-file command line option. We will use
the latter in this example:

Applying full playbook to trident group
Attention
The nginx role is designed to support use of Letsencrypt for SSL
certificate generation. Because Letsencrypt imposes a limit on the number of
certificates that can be generated for a given DNS domain name per week,
the default is to use the “staging” facility (i.e., the default is
certbot_staging: yes globally.) It may take a few full playbook
runs to ensure that all variables are defined and set properly, which
could exhaust the limit of certificates if the default was to generate
real certificates each time the nginx role gets applied.
After you are sure things are working properly, edit the
inventory/trident/nodes.yml file and change the setting to
certbot_staging: no and apply the nginx role one more time to get
valid certificates.
Once valid certificates have been generated once, you can create a backup
that can be restored later for development testing purposes in case you
have to destroy the /etc/letsencrypt directory and start again (as
occurs when using Vagrants and doing vagrant destroy, or terminating
virtual machines in cloud service providers.) This process is described
in Chapter Creating a Backup.
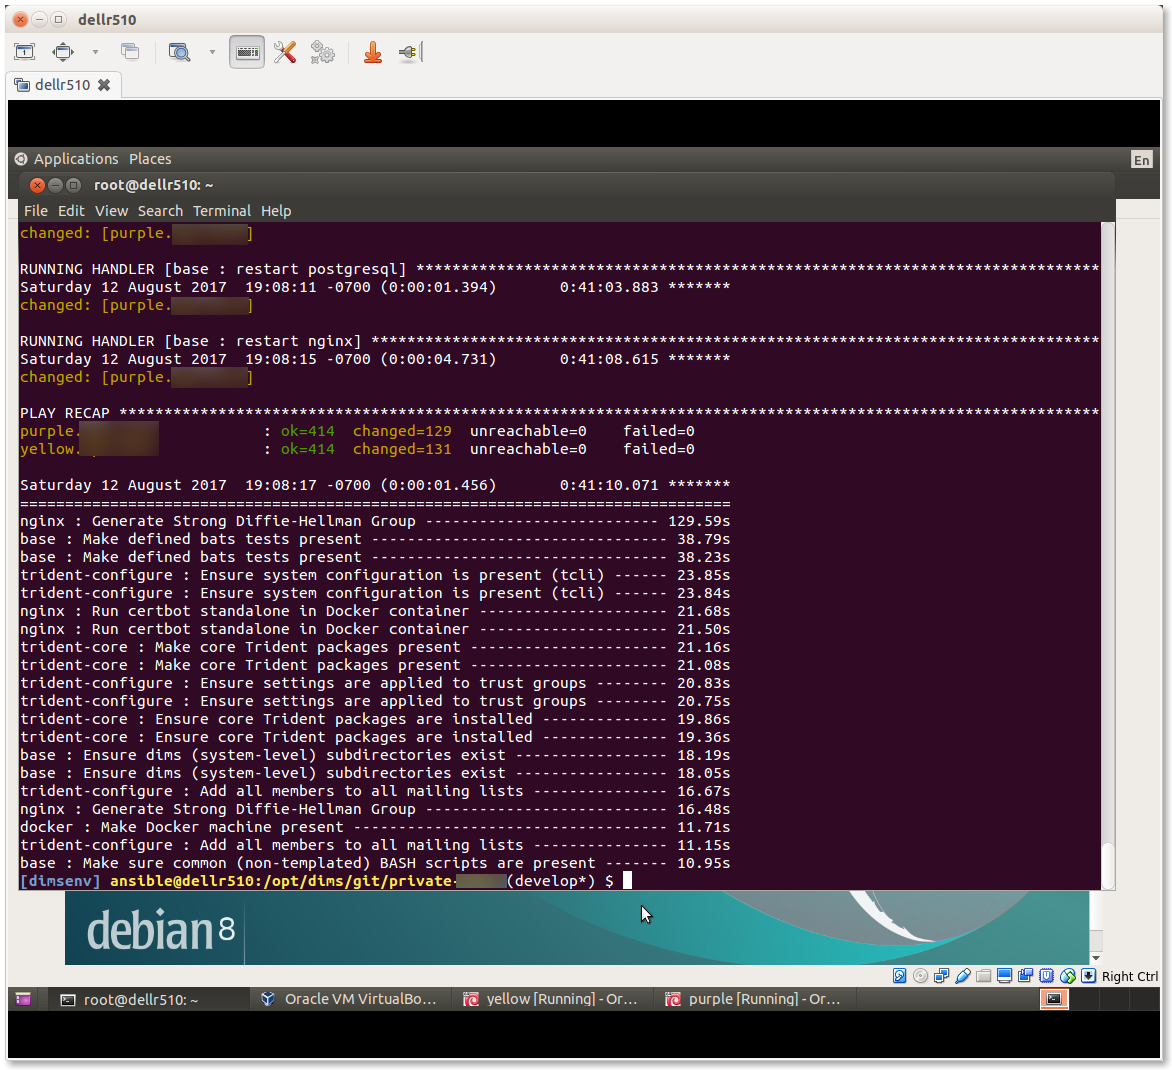
Summary of full playbook run
This completes the installation of the two VMs.
Attention
As these VMs were created using a NAT interface, but are meant to normally
operate using a bridged adapter for Internet facing access to the portal
and for email processing, one last configuration change is to disable the
eth0 NAT interface so its DHCP assigned default route does not conflict with
the default gateway setting of the eth2 interface. To do this, you will
need to go the Settings tab, then unselect Cable connected for
Adapter 1 on each VM as shown in Figure Disconecting cable to NAT interface.

Disconecting cable to NAT interface
At this point, it would be a good idea to create snapshots of the VMs in this initial working state to have something to fall back on in case of mistakes at a later date. This is shown in Figure Creating Snapshots in Virtualbox and the steps to perform are described in How to use snapshots in VirtualBox and the Virtualbox document, Chapter 1. First steps.
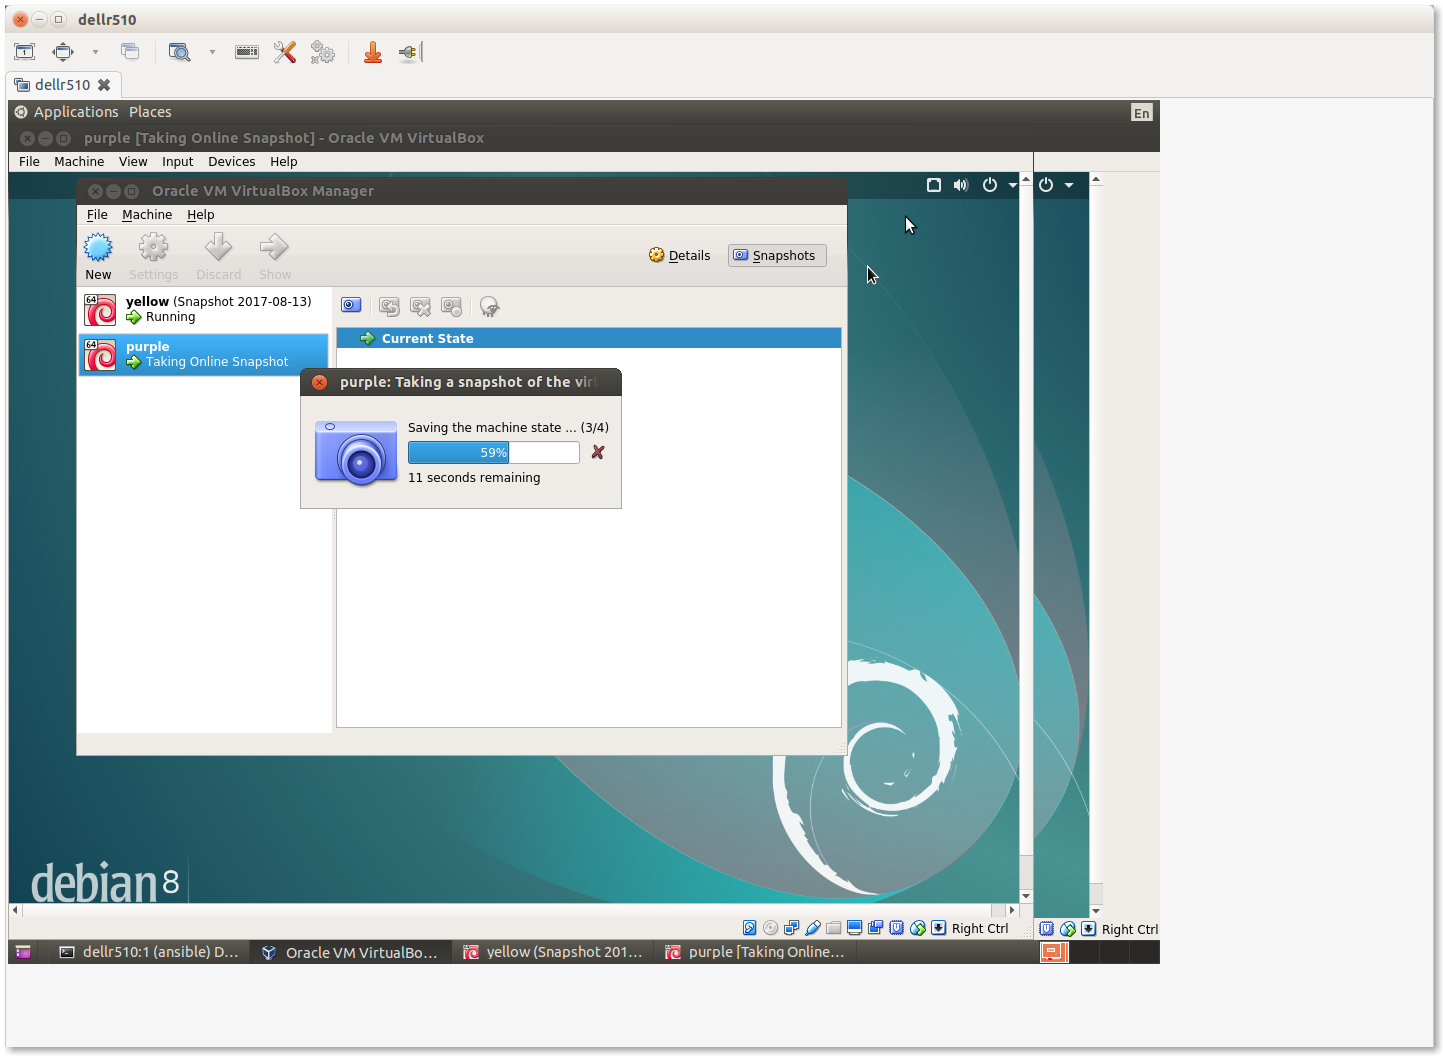
Creating Snapshots in Virtualbox